About
About 

Walt Disney World Resort is opening back up. Are you planning on visiting the parks when they reopen? These park essentials are for you!
Posted in: Disney, Movies, Nerd Food | Tagged: disney, Disney food, HRL, nerd food, star wars, The Last Jedi
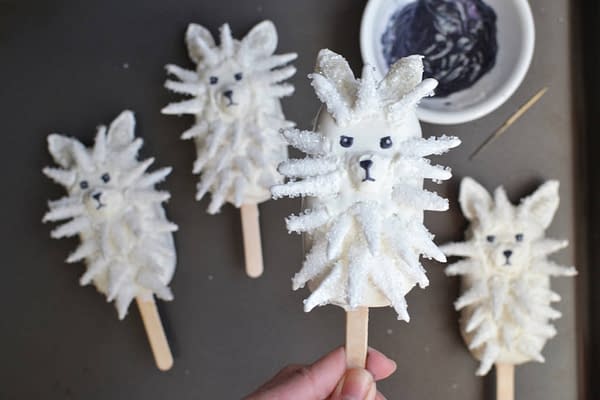
Nerd Food at Home: The Last Jedi Crystal Fox Cake Pops!
May 4th will be here in a mere few weeks, and coming with it will be all the May the 4th jokes and parties that you can stomach! To get you in the Star Wars spirit, why not try these Crystal Fox Cake Pops, inspired by the adorable critters from The Last Jedi? Courtesy of Disney Family:
Ingredients
- 1 Cup white chocolate candy melts
- Piping bag
- Piping tip
- Parchment paper
- 1/4 Cup white sanding sugar
- 1 box vanilla cake mix + required ingredients
- 5-6 Tbsps vanilla frosting
- Silicone popsicle mold
- Wooden popsicle sticks
- Black candy melts
- Toothpicks
- 3 Tbsps grey sanding sugar
Directions
-
Prepare the chocolate "crystal fur" by melting 1/2 cup white chocolate candy melts in the microwave. Pour into a piping bag fitted with an icing tip.
-
Pipe the melted white chocolate onto parchment paper, making thin triangle shapes in varying lengths. Pipe larger triangle pieces for the ears and a round shape for the snout. Generously sprinkle white sanding sugar on top while the chocolate is still wet. Place the piped "crystal fur" into the refrigerator to harden for about 20 minutes.

-
Prepare the cake. Once cooled, crumble finely into a large bowl.

-
Incorporate the frosting into the crumbled cake, 1 tablespoon at a time, until the cake is moist and can hold its shape. Once the cake and frosting mixture is ready, press the mixture into popsicle molds, ensuring to fill them completely.
-
Insert a popsicle stick into each of the cake pops. Place into the refrigerator for around 15 minutes to set.

-
Melt the remaining white chocolate in a medium sized bowl.

-
Remove cake pops from fridge.
-
Carefully dip pops into the chocolate until covered. If there are areas missing chocolate, carefully spoon chocolate over until completely covered. Let the extra white chocolate drip off.

-
Take the white chocolate pieces out from the fridge. Assemble the ears, snout, and spikes onto the cake pops individually. Start at the face and work outwards to the body. Try to work quickly at this stage because the chocolate will dry!

-
Melt black candy melts. Then use a toothpick to draw the nose, mouth, and eyes.
-
Place the finished pops onto a cooling rack and wait to dry completely.

Enjoyed this? Please share on social media!
Stay up-to-date and support the site by following Bleeding Cool on Google News today!